
1 Month of 2025 is gone already 🚪🚶♀️. This volume covers fault-finding techniques brain teasers & tools to help you get your job done quicker.

Here's a little challenge to spark your curiosity and test your creative thinking. Three riddles, let's see what you got?
I have a switch but I'm not a light, I stop the flow but I'm not a dam. What am I?
I'm often flexible but sometimes rigid, protecting wires from damage. What am I?
I can flash without a camera and strike without a warning. What am I?
Answers at Bottom
Electrical fault finding can be the job's worst but most rewarding part. Nothing beats that feeling when you find and fix that fault that another electrician couldn't fix. Below we have broken down some possible methods to fault-find.
Fault 1 - Short Circuit
A "short circuit" is an electrical scenario where a current flows through an unintended path with very low resistance, causing a much higher current than normal, resulting in a sudden current surge.
Possible Causes
- Damaged insulation or worn-out wiring
- Loose connections cause wires to touch
- Water ingress in electrical equipment
- Faulty appliances or overloaded circuits.
Here is a method on a walkthrough to find a short circuit on a socket circuit:
Step 1: Safety First
Isolate the circuit, turn off the power at the consumer unit and ensure the circuit is de-energised.
Then "Lockout/Tagout", secure the breaker to prevent accidental re- energisation, and verify power is off using a voltage tester to confirm no voltage is present at the sockets.
Step 2: Visual Inspection
Examine the sockets and appliances, and look for any visible damage, burnt marks, or loose connections on sockets, wiring and appliances.
Step 3: Test for Insulation Resistance
Set up the insulation resistance tester (Megohmmeter), and disconnect all loads and sensitive equipment from the circuit.
Disconnect the neutral conductor from the neutral bar to prevent false readings.
Test between the following:-
- Line (L) & Neutral
- Line (L) & Earth (E)
- Neutral & Earth (E)
Test readings below 1 ohm suggest a short circuit or direct contact between conductors.
Step 4: Divide the Circuit into Halves
Identify the circuit layout and trace the circuit path, noting key points such as junction boxes, spur connections, and sockets.
Then break the circuit midway, open a midpoint connection, such as a junction box or socket & test each half of the circuit using the insulation resistance tester to identify which half contains the fault.
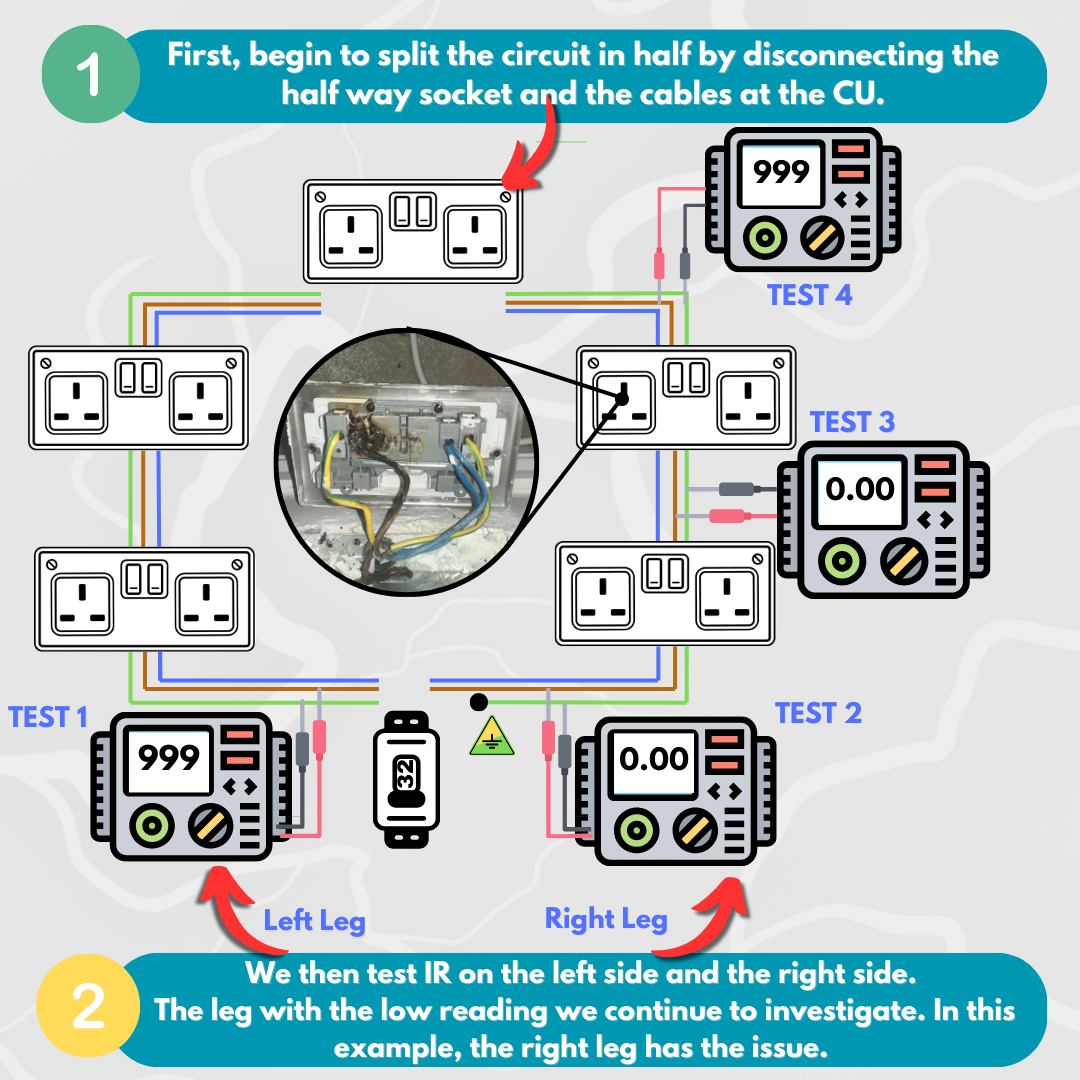
Step 5: Narrow Down the Fault Location
Repeat the insulation resistance test on the faulty half, continuing to divide the circuit into smaller sections by testing further down the path, isolating smaller parts each time.
The section with the lowest insulation resistance will contain the fault, if the reading remains below 1O a short circuit is confirmed.
Step 6: Locate the Specific Fault
Inspect the faulty section, by this point, you will usually find the fault is obvious, for example, heat or water damage will be obvious once the socket is removed.
It's fairly unusual for a cable to break down in a wall and cause a fault unless work was being carried out and someone screwed through a cable.
Step 7: Repair and Retest
Fixing the Fault:
- Replace damaged wires or components
- Tighten loose connections and secure terminals
- Ensure proper insulation between conductors
- Re-Test Insulation Resistance
- Verify the resistance is now within acceptable limits (typically above 1 megaohm).
- Restore Power and Test Circuit Functionality
Reconnect the circuit, energise it, and test the sockets for proper operation using a socket tester.
Fault 2 - Open Circuit & High-Resistance
An open circuit occurs when the path for electrical current is interrupted, preventing electricity from flowing to the intended load or if the CPC Conductor is broken leading to no circuit protection.
Possible Causes
- Broken, loose or disconnected wires
- Faulty switches or blown fuses
- Loose connections
- Broken components within the appliance
Example: Scenario
An EICR has been carried out on a socket radial circuit and the electrician had a reading of 999 Ohms on R1+R2 but all sockets still have power.
Steps 1 & 2 :
These are the same as the previous section as they are standard checks you should carry out with any fault-finding activity.
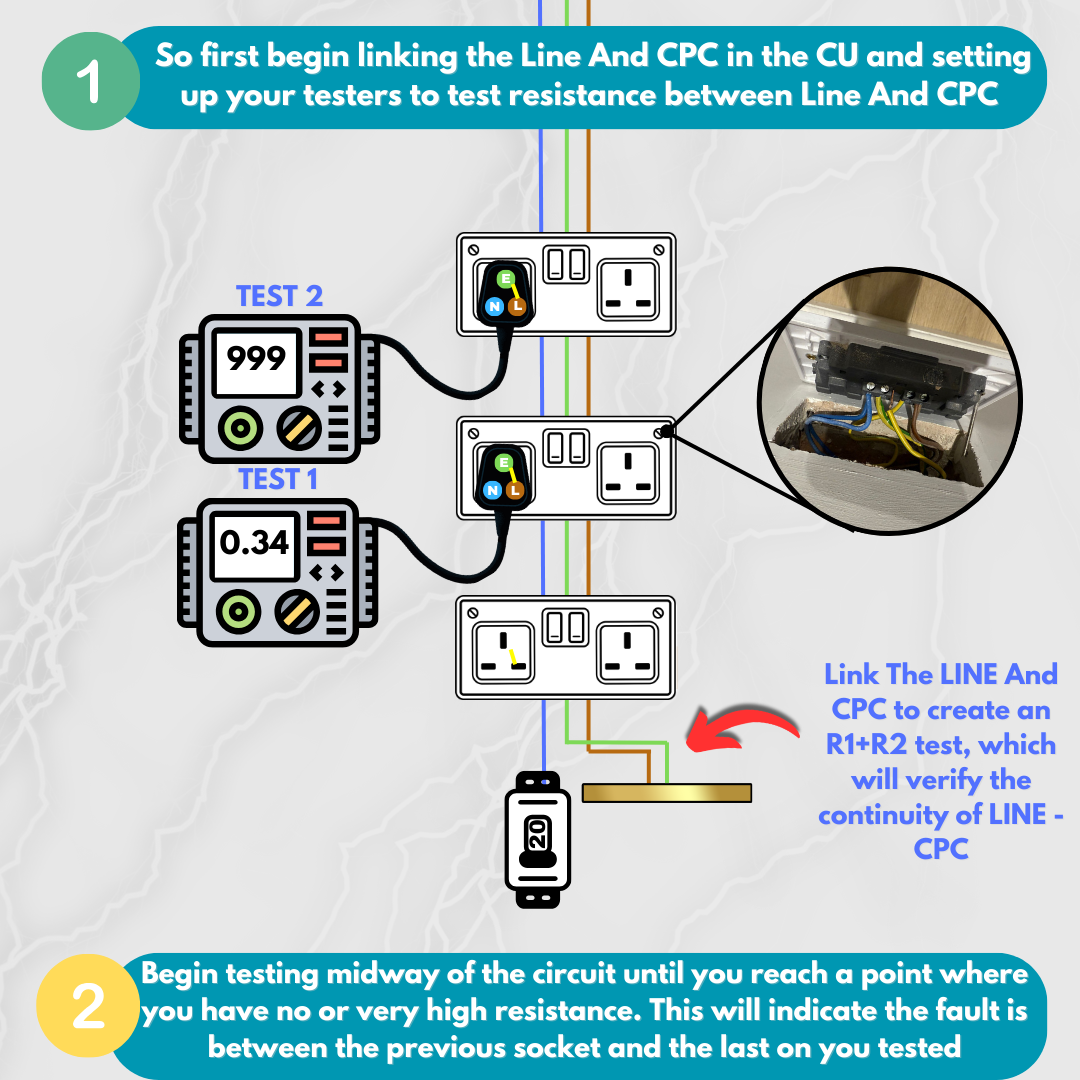
Step 3: Break the Circuit into Halves
Begin at the consumer, and test the socket mid-way from to the consumer unit. Test between a conductor that is continuous throughout the circuit and the conductor that isn't, being sure to have the same 2 cables linked in the CU. If you get continuity, move further away, dividing the circuit up into sections. Until you reach a point where you have no continuity.
This will indicate that the break is between the current socket and the socket that was last tested. Continue testing between these two points until we are left with 2 possible sockets that could contain the fault. The fault could either be in 1 of these sockets or the cable itself is damaged. The cable being damaged is very unlikely unless it has been disrupted. Most often it's a cable popped out in the back of a socket. See the photo for a better visualization.
Step 4: Address the Fault
- If a wire is broken or loose, strip it back, reconnect, and secure it properly.
- Replace any damaged components, such as a socket or a section of cable.
- Clean corroded terminals and ensure a solid, clean connection.
Step 5: Verify and Restore Power
Re-test the circuit & reconnect all wires and test the entire circuit for continuity and resistance.
Restore power at the breaker panel and use a socket tester to confirm the proper functionality of all outlets.
Tips:
- Mark sockets as you test them to avoid repetition or confusion.
- Document readings and findings for reference.
- Draw out the circuit in the way you believe it's wired, and tick off the cables you have checked.
Fault 3 - Reverse Polarity
Imagine you've recently installed a new circuit in your house. You're carrying out your post checks and there is already a light plugged into a socket you want to test, you remove the lamp from the socket and plug in your tester but a fault appears "Reverse Polarity".
Possibilities Causes
- Incorrect Installation (through rushing and not checking work)
Step 1: Verify the Issue
Unplug the appliance, and use a socket tester, If the tester shows "Live/Neutral Reversed" or similar, you've confirmed reverse polarity.
Step 2: Isolate the Circuit
Switch off power at the consumer unit (fuse box) for the circuit serving the suspect socket. Double-check using a Multi-meter to ensure no live current is present at the socket.
Step 3: Inspect the Socket
Remove the faceplate and inspect the wiring (UK Wiring)
- Live Wire (Brown): This should connect to the L terminal.
- Neutral Wire (Blue): Should connect to the N terminal.
- Earth Wire (Green/Yellow): Should connect to the E/Ground terminal.
Look for errors, as If the live and neutral wires are swapped, this is the cause of reverse polarity.
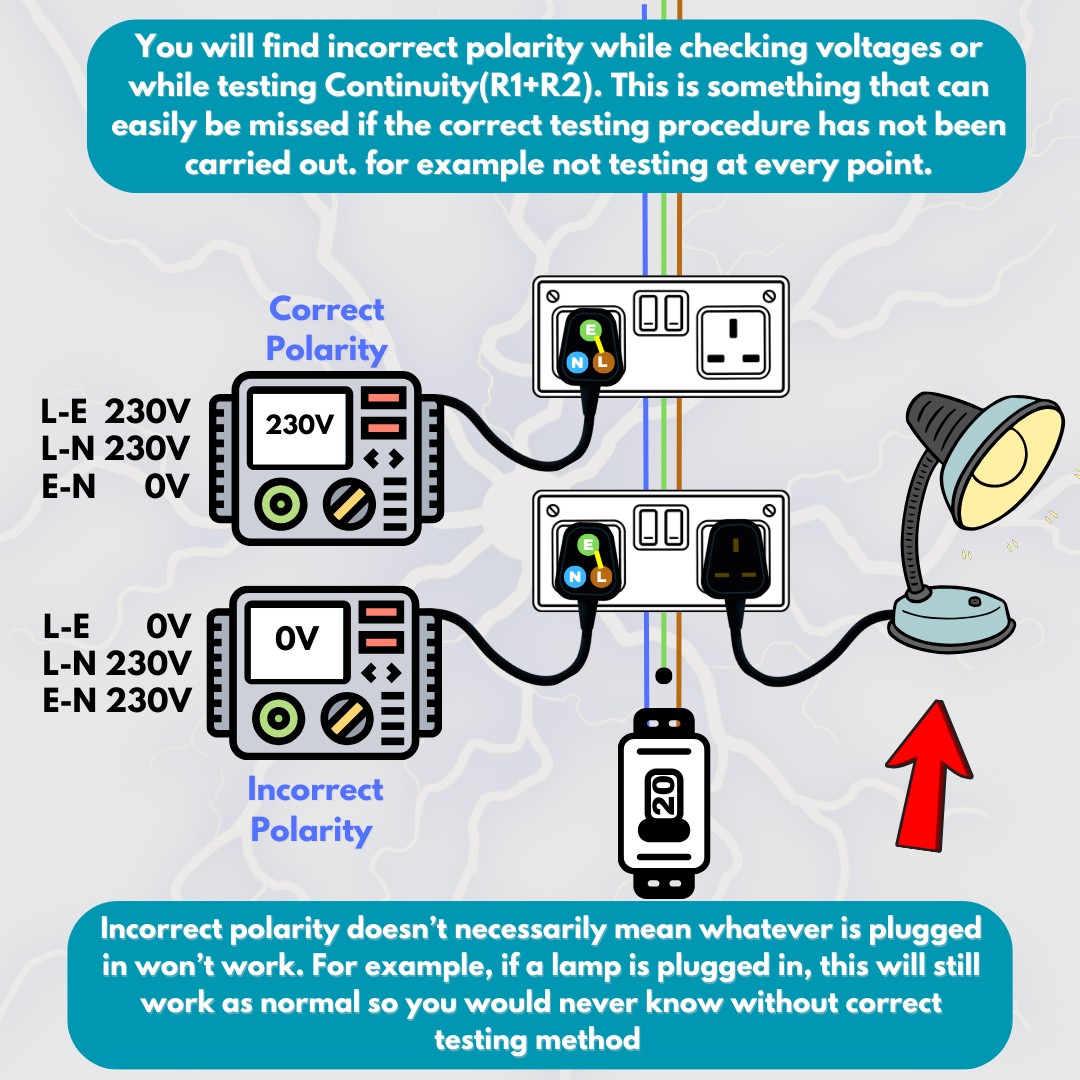
If the wiring is incorrect, rearrange it accordingly to the correct locations.
Step 4: Test the Appliance
Power back on once all reconnected, retest the socket using the correct test tool and if all is good plug your appliances back in.
Why did the Light still work?
Equipment like lamps, heaters, or basic appliances use resistive components that don't depend on polarity. Current flowing in either direction generates the same result (e.g., light or heat).


Super Rod has been in the game for years, designing tools that make electricians' lives easier from electricians themselves.
When it comes to ensuring the safety and compliance of electrical installations, understanding the nuances of testing procedures is critical. Insulation resistance testing, in particular, plays a vital role in assessing the integrity of wiring and equipment, as recent regulation changes suggest
"IET Book - Guidance Note3 - Inspection and Testing Chapter 2.6.7: For Insulation Resistance testing BS 7671:2018+A2:2022 permits the test voltage applied to circuits following connection of equipment to be reduced to 250 V DC, provided that cables were tested at 500 V DC prior to connection"
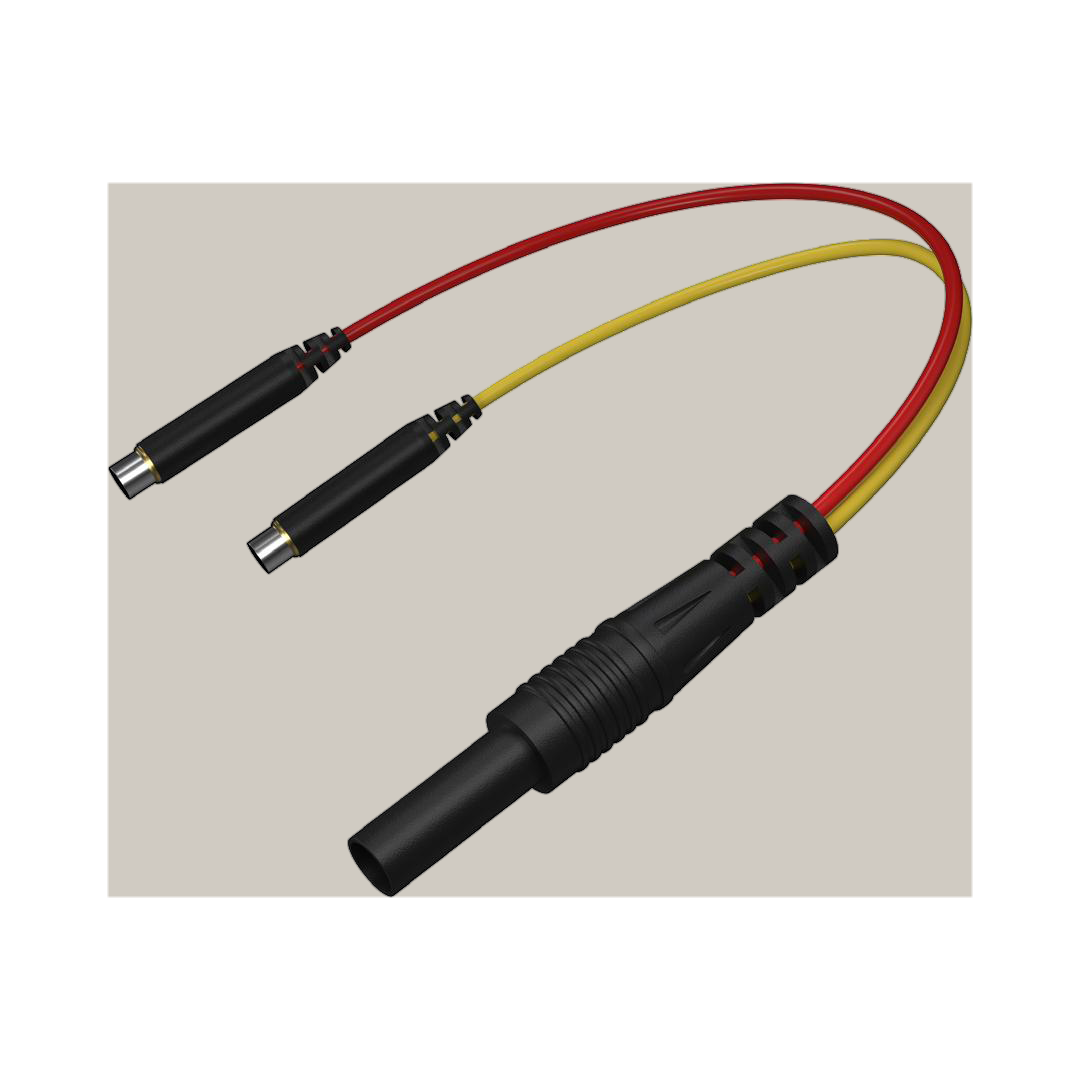
Tired of wasting time troubleshooting cable runs? 🧵🎯 Say hello to the Super Rod IR Link, your new best friend for testing continuity in seconds! 🕒
What does it do?
The IR Link is the ultimate cable tester for when you're on-site and need reliable results fast.
Why you'll love it:
- ✅ Fast results - No more second-guessing connections.
- ✅ Portable & lightweight - Fits right in your tool bag. 🛠️
- ✅ Easy to use - Designed with electricians in mind.
- ✅ Saves time - More jobs
The investor himself Wayne has created a video breakdown explaining the tool's function and features.

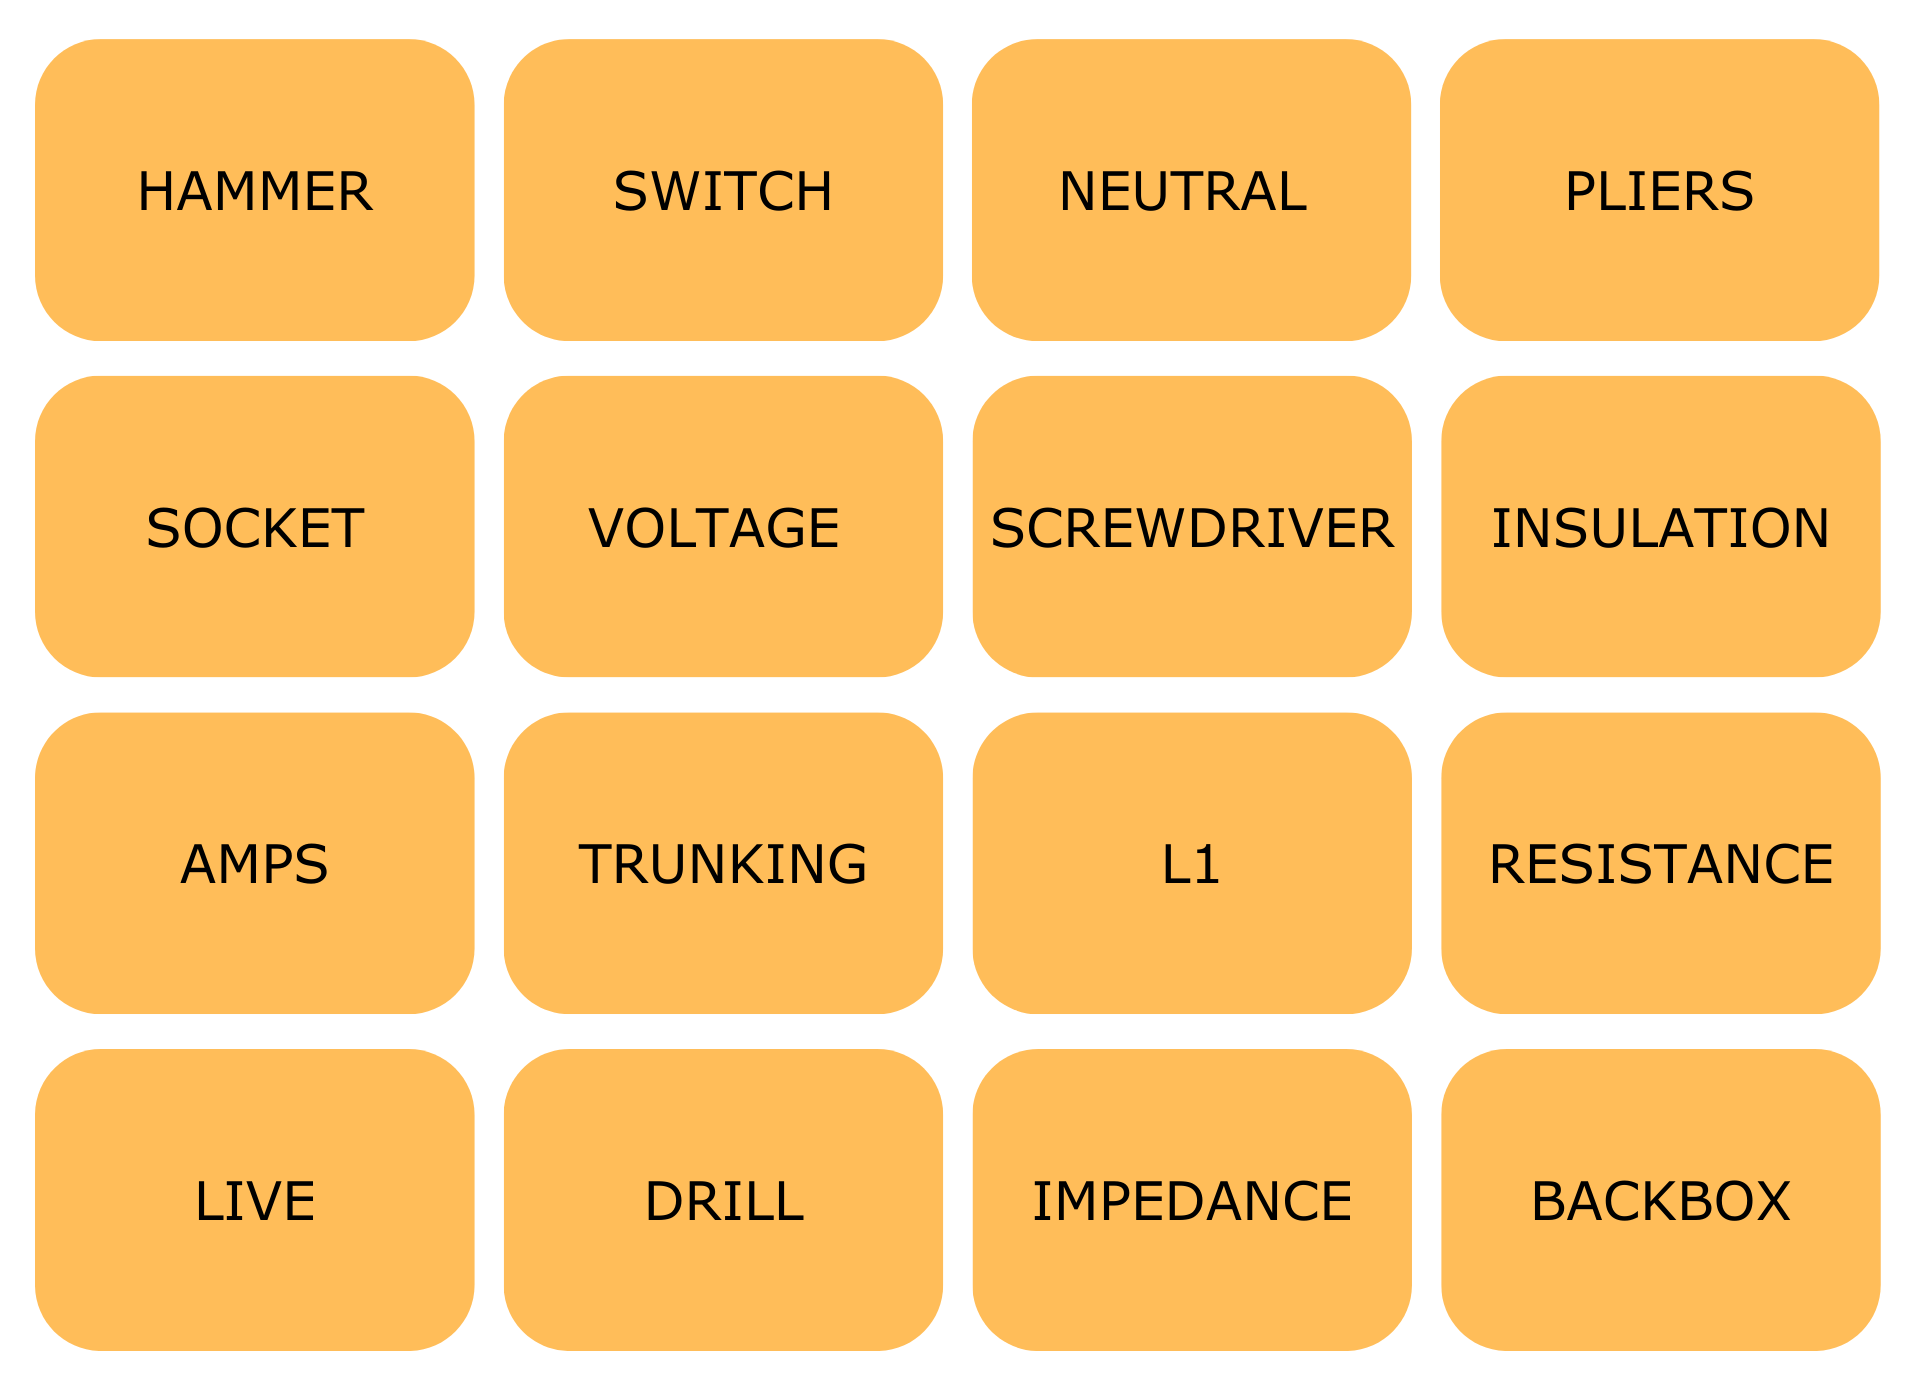
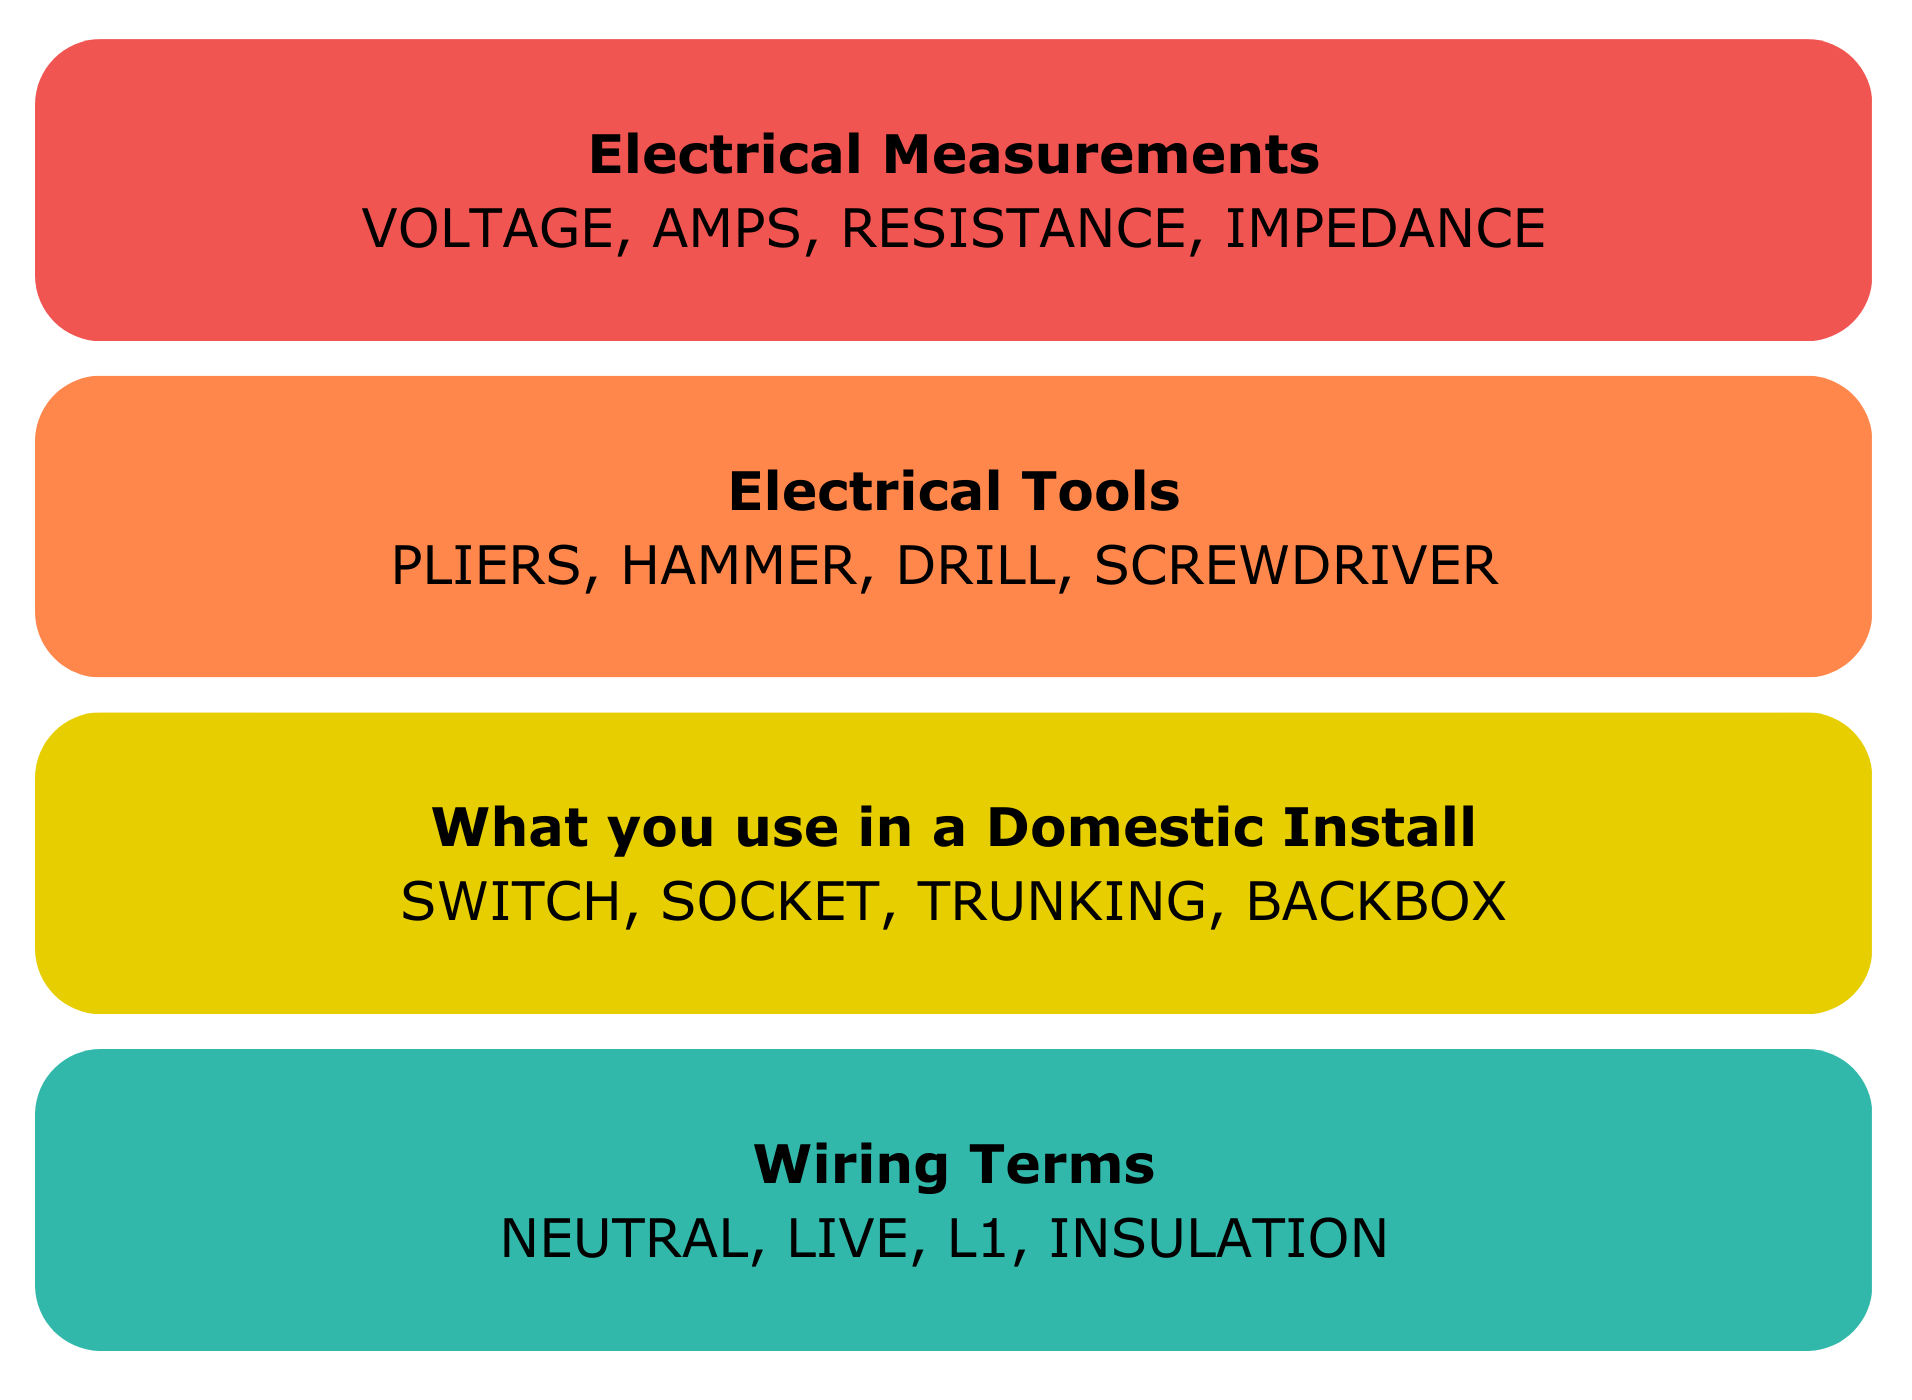
Your challenge is to group the 16 words below into four categories, each with a common theme. The words might belong to categories for example Apple, Microsoft, Google and Amazon (Big Tech Companies)
Some words might seem to fit in more than one group, so think carefully before making your connections.
 Answers at Bottom

Below are some tools that have helped many electricians get out of sticky situations.
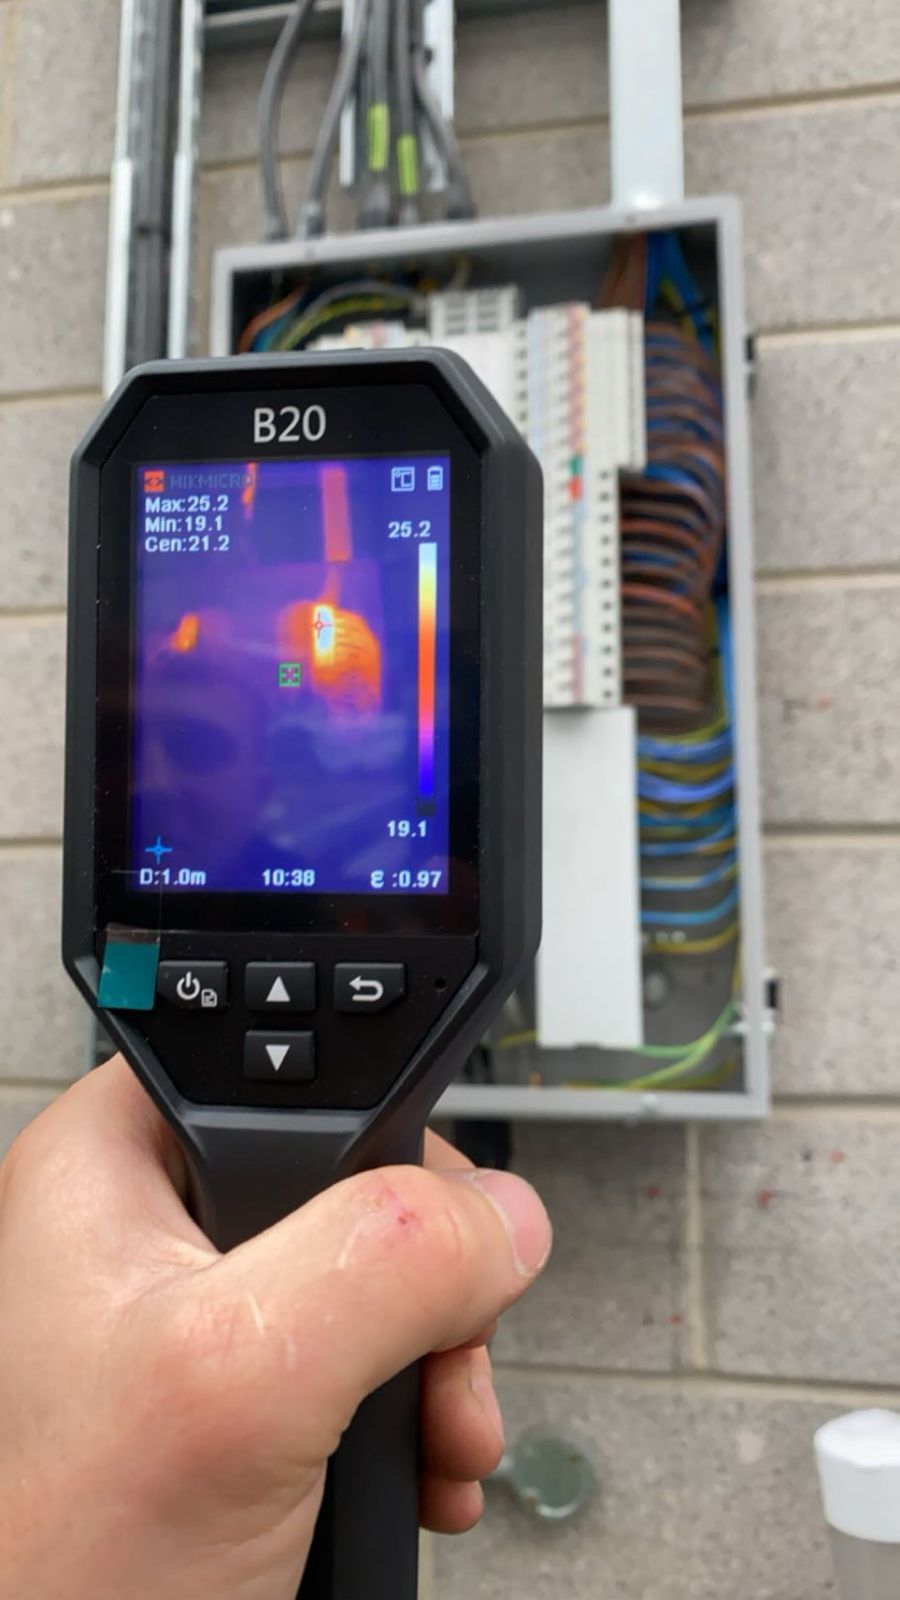
Thermal Imaging Camera
By detecting heat patterns and temperature anomalies, they allow you to spot potential issues like overloaded circuits, loose connections, and failing components before they escalate.
Inspection Camera
These gems offer a clear view of hard-to-reach areas without dismantling any equipment. Perfect if you're working in a domestic situation where you need to see into the cavity for damage. These cameras allow you to quickly identify issues like damaged cables, loose connections, and even blockages in conduits.

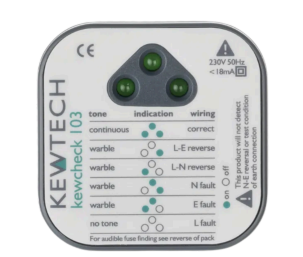
Socket Tester
These are a must-have for any electrician, especially if you regularly install sockets, a great way to ensure the socket is safe for use. Ensure your cables are in the correct locations and there are no faults across any conductors.
MFT (Multi-Functional-Tester)
This is a given, a device that does what it says, and tests multiple ways in different functions. A great piece of kit ensuring compliance with regulations like BS 7671.

I have a switch but I'm not a light, I stop the flow but I'm not a dam. What am I?
Answer: Circuit Breaker
I'm often flexible but sometimes rigid, protecting wires from damage. What am I?
Answer: Conduit
I can flash without a camera and strike without a warning. What am I?
Answer: Lighting

If you're interested in doing this daily the New York Times does a brand new one every day on their website.

If you are interested in becoming a sponsor of the newsletter or want to be featured like Mark above please don't hesitate to reach out. Link to contact us below
Contact us here!The material and information contained in this newsletter is for informational purpose only, you should not rely upon the material or information on this newsletter, all readers must make their own judgment and seek professional advice when making decisions based on the context of the newsletter